


Using Compression on Digital Audio Tracks
Why even use compression? What is it? How do I use it? Heck, I don't know. If you do, email me! Ok, I'm kidding. I do know a bit about it. Here goes ... In short, compression reduces the dynamic range of a track. There, that wasn't so bad. So what does that mean? It means that applying compression to a track lowers the ratio (yes, more math) between the very loudest bits and the softest bits. By reducing the volume of the loudest bits, you can turn up the overall volume of the track. The result is a higher 'apparent' volume (actually, after turning up the track, the loudest bits are back to the same volume they were before, but the softer bits are now louder). Here's a typical snare hit. Raw.. no compression. It's loudest at the very beginning of the sound. This is called the attack. As the sound decays, you have the... well.. decay. Note the dynamic range of the drum hit; from full volume down to nothing in 265 milliseconds. Also note the 1-to-1 ratio meaning that no compression was applied. 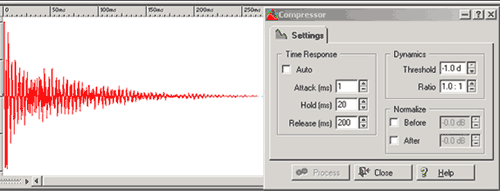
This next image was taken after mild compression was applied. You can view the settings that have been chosen in the Compressor section of the graphic. You can easily see the effect of a 3-to-1 ratio by studying the attack portion of the WAV. Based on these compressor settings, bits louder than -8 dB have been compressed at a 3-to-1 ratio. The resulting sound is somewhat softer allowing the entire track to be raised in volume. Note that the dynamic range is now less-than-full volume down to nothing in 265 milliseconds. 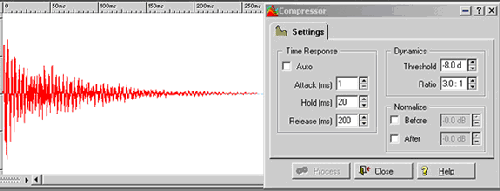
The next image shows the same raw snare hit compressed even further. This was done by lowering the threshold to -18 dB. The same ratio was applied, but compression was more intense since it was applied at a lower volume level. Note how much the attack has been reduced in volume (much reduced dynamic range). Because the loud bits (attack) have been reduced in volume, we can now turn up the track's overall volume. 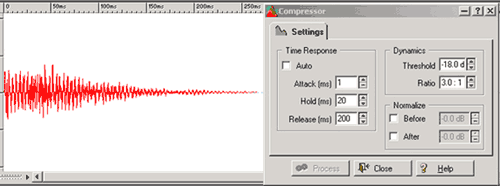
Now that we've seen how compression lowers the dynamic range of a WAV, we can better understand how the apparent volume of a track can be increased. This next image shows the above compressed WAV after it's been re-normalized to 0. The loudest bits have been returned to the highest volume possible (without clipping), but the softer bits are now louder. The end result is a seemingly louder track with more sustain (but less attack). Note that the dynamic range is again full volume down to nothing in 265 milliseconds. However, the decay is much less drastic allowing the listener to hear notes that otherwise would have faded out of the hearable range (covered by other instruments perhaps). 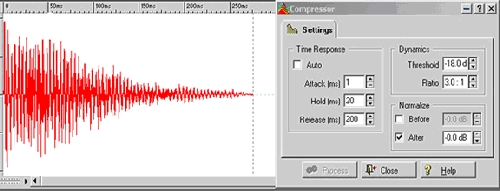
Compression techniques don't stop with simple dynamic range reduction. In this final image, you can see the affects of the more advanced technique of increasing the length of the attack. With these settings, 5 milliseconds of the sound is bypassed untouched before the compressor kicks in. The end result is quite different when compared to using a lower attack time in that the initial slap of the drum head cuts thru before compression is applied. This method won't allow you to raise the overall track volume (since the loudest bits are untouched), but it greatly increases the 'punch' of the track. Since the attack is actually accentuated using this technique, the track will appear to be more in-your-face. Remembering what we learned about real room spaces in the reverb section, a drum track with increased attack will tend to make the listener feel like he's closer to the drums (more direct sound, less reflected sound). Try this on bass and vocals as well. 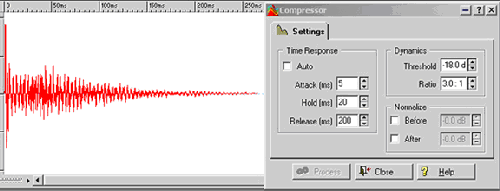
What's the advantage? There are a number of advantages
Are there disadvantages? Yep.
Compression Controls To help us understand a compressor's controls, imagine a little man (we'll call him Mac) inside your mixer. Imagine that Mac is listening to your track and has his hand on the fader (volume control). When the track starts to get too loud, Mac turns down the fader. When the track gets softer again, he turns the fader back up. With that in mind ...
Common Settings (just a place to start... there is no spoon). Since compression changes the dynamic range of a sound, and since that change affects the tonality of the sound, you need to be careful with compression. An over-compressed track can ruin a good song. Remember, how much compression you need depends on your track, it's OK to experiment, and trust your ears. Still, there's value in covering a few basics.
Reference Materials:
Home ~ Getting Started ~ Recording ~ Mixing ~ Mastering ~ Promotion ~ Troubleshooting ~ Contact Us  If you have a question about Audio, please Visit Our Forum: Audiominds.com Forum. Copyright © 2003 www.AudioMinds.com All Rights Reserved. |